Printing Table Reports
You can print a Mercury report in two different ways:
- Print-Preview - displays the report in a "Print Preview" window, so that you can see what it looks like and change your page layout before printing.
- Quick-Print - immediately sends the report to your default printer, using your current Mercury print options (more on print options below).
With either method, you can set a variety of print options to control the output. Print methods and printing options are found on the Print Options tab of the main ribbon.
For convenience, you can also print from the Home ribbon.
Print Options tab
The Print Options ribbon tab has several sections. The first three sections are common to both Pivot- and Table-reports.
Common Sections
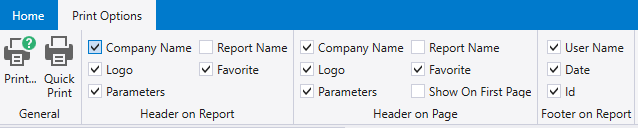
- General - Contains buttons for print-preview and quick-print. See above for details.
- Header on Report - Content to include in the report header (every page).
The company name and logo are specified as part of the Mercury installation. "Parameters" will include the parameter values used to run the report. "Favorite" shows, if applicable, the name of the Favorite on which the report is based.
For more on Favorites, see Favorites.
Header on Page - content to include in every page of the report. The options listed under this category are very similar to the options under Header on Report except for Show on First Page. This option will enable the user to display the header on each page of the report starting from the first page.
- Footer on Report - Content to include in the report footer (every page)
User Name is your Windows login name. Id is the ID# of the report as shown in your main reports list.
The Print Options ribbon tab displays one additional section that depends on the report type - Pivot or Table.
Table Print Options (for Table Reports Only)
- Total Summary and Fixed Total Summary - see Summarizing.
- All Details - If you have a master/detail table report, this includes details even if you have not exposed them on the report canvas. If you un-check this option, only details that are exposed on the report canvas are included in the printout.
- Selected Rows Only - When checked, prints only data-rows that you have selected (highlighted) on the report canvas.
Pivot Print Options (for Pivot Reports Only)

Print Preview
The Print Preview window shows you how the printed report will look, and has its own ribbon that offers various navigation and customization controls.
Print
- Print - Opens a printing dialog for selecting a printer and specifying other settings.
- Quick Print - As noted above, sends your report directly to your current default printer.
- Page Setup - Opens a dialog for specifying page options - size, orientation, etc.
- Scale - Opens a dialog for scaling your printed output, including fitting it to a specified number of pages. This also affects the preview.
Navigation
Offers various controls for moving around in the print preview
Zoom
These controls affect only the print-preview display - not the actual printed output. If you want to "zoom" the printout, use the "Scale" control mentioned above.
View
Change the displayed page layout (single vs multiple), switch between continuous and page-at-a-time scrolling, and (if a cover page has been specified) include or exclude it from the printout.
Export
- Export - Exports the report; several formats are available. A dialog box allows you to choose the export format and the destination file. Expand More Options for additional control over the export. The specific options available depend on the export format.
- Send - Similar to export, but after the export file is created, a new email is started with the file as an attachment.
You can avoid print-preview and export report-results directly from the main window’s Home ribbon, or from the main window’s report-specific ribbon. Additional settings may be offered this way; for more information, see Exporting Table Report Results.
Document
- Watermark - Adds a text and/or picture watermark. It will appear both in the display and on your printed output.
- Properties - Opens a new window with a properties grid so that you can control other print settings in detail, including page-header and page-footer.
These settings get their initial values from the Print Options ribbon.
For more information on Print Options settings, see Main Window > Ribbons > Home and Print Options ribbon.
Related Articles
Printing Pivot Reports
You can print a Mercury report in two different ways: Print-Preview - displays the report in a "Print Preview" window, so that you can see what it looks like and change your page layout before printing. Quick-Print - immediately sends the report to ...The Table Report Ribbon
General Run - Run the selected report (values for all parameters must be supplied for this to be enabled). See Running Table Reports for more information. Print - Print the current report. See Printing Table Reports for more information. Export - ...Introduction to Table Reports
A Table report presents data in a simple tabular layout, similar to an Excel worksheet. Unlike Pivot reports, Table reports do not allow you to have multiple levels of row or column breakouts, or exchange rows and columns. But you can still do a lot: ...Reports
Manage Reports The Manage Reports form lets you create and edit reports, assign User accesses, and perform other maintenance tasks. (Note: Mercury allows users who run the report to modify the layout and save as a Favorite, so you don't have to worry ...Running Table Reports
Pivot reports and Table reports are run in exactly the same way. The following examples may show pivot-reports, table-reports, or a mixture - it doesn’t matter. Reports are run in one of two ways. Running from scratch: select the report, specify the ...